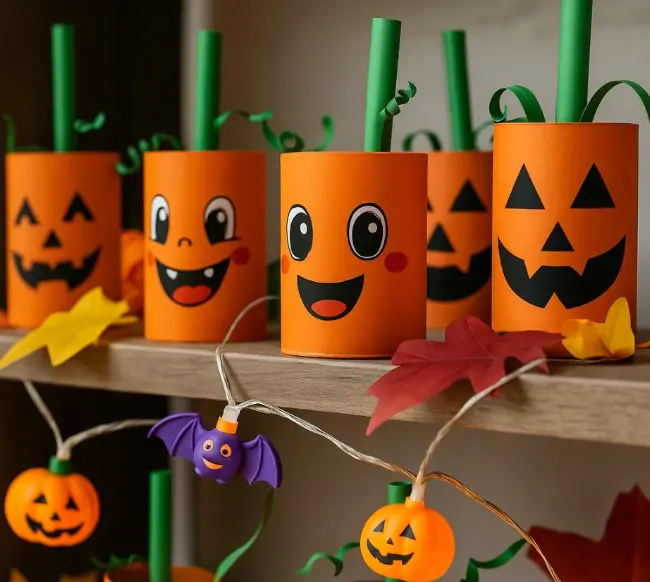
Looking for a fun, frugal, and fabulous way to decorate for Halloween? Look no further than your recycling bin! These DIY Toilet Paper Roll Pumpkins are the perfect upcycled craft to spark creativity in kids and adults alike. They’re incredibly simple to make, require minimal supplies, and add a charming, handcrafted touch to your seasonal decor. Whether you’re planning a kids’ party or just want a cozy family activity, these little pumpkins are sure to bring a smile to everyone’s face.
Let’s turn those everyday cardboard tubes into a patch of adorable pumpkins!
Materials You’ll Need
Gathering supplies is half the fun, and you probably have most of these items already.
- Empty Toilet Paper Rolls: The star of the show! Collect a few in advance.
- Orange Paint or Orange Construction Paper: You can either paint the rolls directly or wrap them for a different texture.
- Green Paper or Pipe Cleaners: Perfect for creating the stems and cute little vines.
- Black Marker or Black Paper: For drawing or cutting out classic pumpkin faces.
- Scissors and Glue: Essential tools for assembly.
- Optional Embellishments: Googly eyes, green pipe cleaners, fake leaves, glitter, or battery-operated string lights to make your pumpkins extra special.
Step-by-Step Method: Creating Your Pumpkin
Follow these five easy steps to create your own unique pumpkin patch.
Step 1: Create Your Pumpkin Base
Take your empty toilet paper roll. You have two options here:
- Painting: Cover the entire roll in orange paint. This might require two coats for a vibrant, solid color. Let it dry completely.
- Wrapping: Cut a piece of orange construction paper to the same height as the roll, wrap it around, and glue it in place.
Step 2: Give Your Pumpkin a Personality
This is the most fun step! Once your orange base is dry, it’s time to add a face. Use a black marker to draw on classic jack-o’-lantern features—try a silly smile, a spooky scowl, or a surprised expression. Alternatively, you can cut out triangle eyes and a mouth from black paper and glue them on.
Step 3: Top It Off with a Stem
To make the stem, you can:
- Roll a small piece of green paper into a cylinder and glue it to the inside top of the roll.
- Cut a short piece of a green pipe cleaner, fold it, and glue it in place.
For an extra touch, curl a thinner strip of green paper or a pipe cleaner around a pencil to create a vine and glue it next to the stem.
Step 4: Add Your Own Flair (Optional)
This is where your pumpkin truly becomes one-of-a-kind. Glue on googly eyes for a goofy look, add a small fake leaf to the stem, or sprinkle a little glitter on the top for a magical sparkle.
Step 5: Display Your Pumpkin Patch
Your adorable pumpkins are ready to shine! Line them up on a mantel, cluster them on a windowsill, or use them as a festive centerpiece. For a truly magical effect, place a few on top of a string of battery-operated fairy lights.
Pro Tips for the Best Pumpkins
- Mix and Match Faces: Create a whole family of pumpkins with different personalities. A mix of silly, happy, and spooky faces makes the display more dynamic and fun.
- Create a Glowing Centerpiece: Tuck a small, battery-operated tea light inside a few of your pumpkins. The light will glow softly through the orange paper, creating a warm and spooky ambiance.
- Turn Them into Party Favors: Before sealing the top with a stem, drop a few pieces of candy or small toys inside the roll. They become a fun, surprise-filled decoration for each guest to take home.
- Press for a Different Shape: If you want a squatter, wider pumpkin, gently press the top and bottom of the roll inward before you decorate it.
Frequently Asked Questions (FAQs)
Q: How do I make the pumpkins more durable for young children?
A: If you’re using paint, a layer of clear Mod Podge or craft sealant over the finished pumpkin will protect the design from little hands. Using construction paper might be less messy and more instantly durable for very young crafters.
Q: Can I use paper towel rolls instead?
A: Absolutely! Paper towel rolls can be cut down to the size of a toilet paper roll. You can also leave them long to create tall, unique pumpkins or even a Frankenstein’s monster!
Q: What kind of paint works best?
A: Acrylic craft paint provides excellent, vibrant coverage. Washable tempera paint is a great, kid-friendly alternative, though it may require more coats and can rub off more easily.
Q: My pumpkin won’t stand up straight. What can I do?
A: The rounded bottom can make them a bit wobbly. For a stable base, you can gently flatten the bottom slightly, or glue your pumpkin to a small cardboard square that you can paint green to look like a patch of grass.
Conclusion
This toilet paper roll pumpkin craft is a wonderful reminder that you don’t need a big budget to create memorable and festive Halloween decorations. It’s an activity that encourages creativity, reduces waste, and results in a charming decoration the whole family can be proud of. So gather your supplies, embrace the playful spirit of the season, and enjoy building your very own upcycled pumpkin patch


Leave a Comment